Using Roots with Digital Ocean’s Managed Databases
Managed MySQL Databases are available from Digital Ocean*. They offer daily backups with easy restore points. It’s also fairly straight forward to spin up a read only database to reduce database bottlenecks as your project grows.
There are some pain points with setting up a WordPress install with Managed Databases due to the use of SSL/TLS connections which requires some extra leg work both on DO and within WordPress. Here’s how that can be done.
Assumptions
- This is a new setup and not a migration
- You are using the full Roots.io stack (Trellis, Bedrock)
- You are using the latest HEAD versions of each package
- Your stack is already configured and running locally following the standard install documentation
- The target environment is your production environment
Prerequisites
- SequelPro is not yet compatible with default SSL/TLS MySQL connections, you will need MySQL Workbench. Ugh! Don’t worry though, we just need to run one command then you can burn it to the ground
Configure your droplet(s) and database(s)
First configure your droplet(s) as you normally would with a blank Ubuntu 18.04 box.
Then configure your database with the following settings:
- MySQL 8
- Leave trusted sources blank, leaving your database open to public connections - this can be changed later
After your database has been provisioned create a new user and a new database under Users & Databases. This tutorial assumes:
- User:
wp_user - Database:
wp_database
Then download your CA Certificate from the Overview section and we’re ready to start H@x1ng
Modify database user authentication method
By default MySQL 8, the database DO runs on, uses caching_sha2_password as its authentication method. This is incompatible with MariaDB and is incompatible with Sequel Pro
Not to worry, as a l33t developer you can “360 no scope headshot” this issue by changing the authentication method to mysql_native_password which is supported by this software.
To do this you need to login as doadmin and modify the user wp_user. So open up MySQL Workbench, and add a new connection with the following credentials:
Configure the Connection
Parameters Tab

SSL Tab

Test the Connection
Test the connection, you’ll be logged in because your copy and paste skills are unparalleled right? If you haven’t been successful just double check you’re pasting your own credentials in there which are available from the overview tab in Digital Ocean.
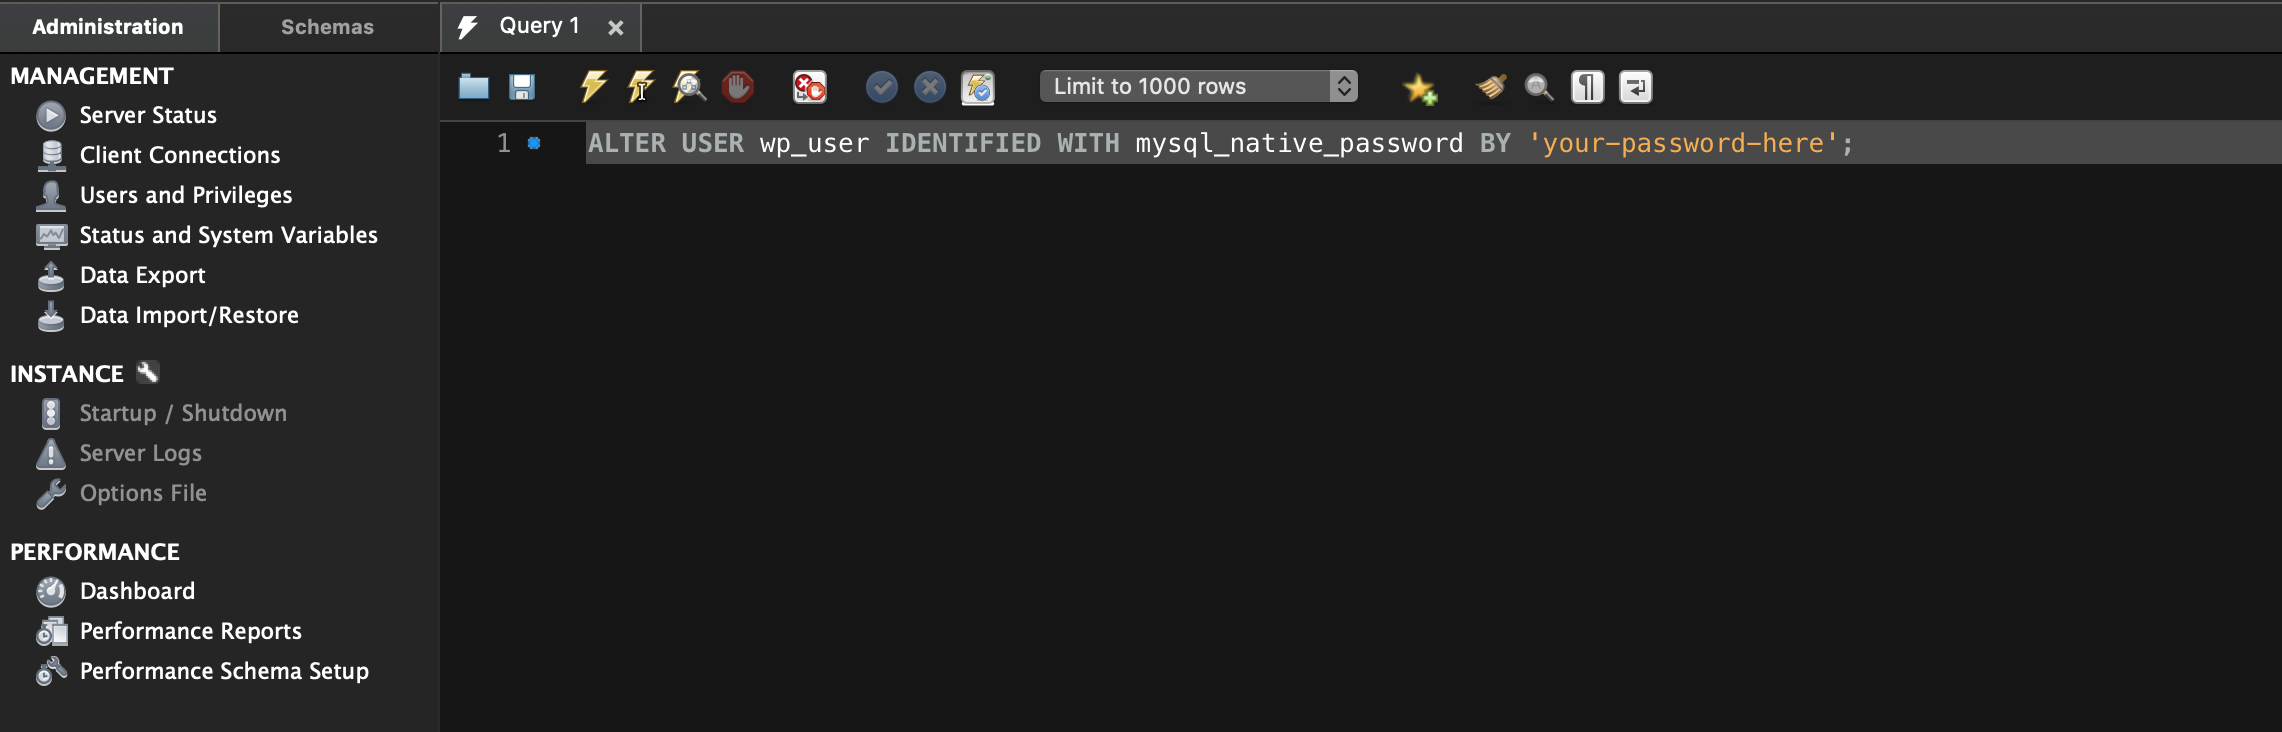
Run SQL Command
Next in the query window we need to run an SQL command to change the authentication:
ALTER USER wp_user IDENTIFIED WITH mysql_native_password BY 'your-password-here';
Obviously you use the password generated for wp_userinstead of your-password-here
Which looks like this:
Run the command by pressing
⌘ Command⇧ Shift↵ Return or in the menu clicking Query → Execute
Confirm change (optional)
After running the command disconnect from MySQL Workbench, and then re-open and re-connect. MySQL WorkBench isn’t the best at updating so this will make sure you’re pulling everything fresh.
Head over to Users and Priviliges. And Select the wp_user you should see that the authentication type is now Standard like so:

Modifying Trellis to automatically install your CA Certificate
The database not only needs a password, but also needs to know the connecting machine has the SSL certificate. So you need to add this to each droplet that connects to a Managed Database.
You do this by copying your certificate to the droplet, storing it in OpenSSLs trusted store, and then telling it to trust that certificate.
Remote Location:
/usr/local/share/ca-certificates
Command to trust newly copied certificates:
sudo update-ca-certificates
But wouldn’t it be great if Trellis did this on Provision automagically? Got your back!
Introducing my shiny Trellis role
I’ve created a role to manage CA certificates for you, after giving it a star it’s time to get it setup by making the following changes:
# Add the following to trellis/galaxy.yml

- name: trellis-ca-certificates
  src: craigpearson.trellis_ca_certificates
# Add the following to trellis/server.yml and trellis/dev.yml (if needed locally)

...
- name: WordPress Server - Install LEMP Stack with PHP 7.3 and MariaDB MySQL
  hosts: web:&{{ env }}
  become: yes
  roles:
    - { role: common, tags: [common] }
    ...
    - { role: sshd, tags: [sshd] }
    - { role: trellis-ca-certificates, tags: [ca-certificates] } # Recommended inclusion point
    - { role: mariadb, tags: [mariadb] }
# Add the following to trellis/group_vars/production/main.yml

trellis_ca_certificates_trusted:
  # Local Source:         trellis/certs/production/ca-certificate.crt
  # Remote Destination:   /usr/local/share/ca-certificates/database.crt
  - name: database
    src: ca-certificate.crt
# Create the following folder structure in trellis/certs

trellis/
├── bin/
├── certs/                            # → Source certificates folder
│   ├── development/                  # → Development certificates
│   ├── staging/                      # → Staging certificates
│   └── production/                   # → Production certificates
│       └── ca-certificate.crt        # → YOUR CERTIFICATE HERE
└── deploy-hooks/
Updating your database config
# Add the following to trellis/group_vars/production/main.yml

env:
   db_name: wp_user
   db_user: wp_database
   db_host: YOUR-PRIVATE-DB-HOST-ADDRESS:25060
   db_ssl: true
# Add the following to trellis/group_vars/production/vault.yml

vault_wordpress_sites:
  example.com:
    env:
      db_password: YOUR-WP-USER-PASSWORD
# Add the following to site/config/application.php

# IMPORTANT the SSL Decleration must come before the HOST config

/**
 * DB settings
 */
if (env('DB_SSL')) {
    Config::define('MYSQL_CLIENT_FLAGS', MYSQLI_CLIENT_SSL);
}

Config::define('DB_NAME', env('DB_NAME'));
Config::define('DB_USER', env('DB_USER'));
Config::define('DB_PASSWORD', env('DB_PASSWORD'));
Config::define('DB_HOST', env('DB_HOST') ?: 'localhost');
SHIP IT!
Now we’re done with that you should commit all your changes, push up to origin and we’re ready to provision and deploy our production server.
- Run
pip install -r requirements.txt - Run
ansible-galaxy install -r galaxy.yml - Run
ansible-playbook server.yml -e env=production - Run
./bin/deploy.sh production example.com
Go to your live URL and complete the 5 minute install
https://example.com/wp/wp-admin/install.php
Final Notes
- You can now restrict your managed database to accept connections from your droplets only
- Anytime you change the
wp_userpassword with the Digital Ocean dashboard you will need to repeat the authentication process in MySQL Workbench - You should consider using MySQL Workbench to remove database rights on any other databases for this user to enhance security
- If you are setting up a multisite, first configure your site as a single install with no multisite constants, you will run into database connection issues if you deviate from these instructions: Create A Network – Advanced Administration Handbook | Developer.WordPress.org
Please show some love 
It would be great if you could follow me on Github or add me on LinkedIn
* Disclaimer: The link to Digital Ocean is an affiliate link, if you don’t have a DO account it would be great if you sign up via this link as another token of appreciation.